knowing
how to create indian web proxy sever would enable you to stand out from other people.when they are searching for it, you will be flexing and using yours.indian web proxy is a
web tunnel used to
bypass anticensorship blocked site. this means that you can use indian web proxy to surf the internet freely with either
MTN network,
GLO network,
ETISALAT network. as at the time of writing this post, IWP was browsing with
etisalat.
before you can use it, you must first of all
create your iwp server. the process can some how look difficult especially for those that knows nothing about hosting an html file.but i am going to make it simple and detailed for even a novice to understand.so if you have been searching for this, then this post is for you.today i am going to share with you on
how to create indian web proxy server.
 |
| indian web proxy |
i will recommend creating yours because you will use it to your satisfaction without sharing it.so many people have been asking me what they need to
create iwp server.the simple truth is that there is nothing special than the usual uploading of
tutorial.php file which require hosting that support php file.
in
creating indian web proxy server, you need a web hosting that support php which will enable you to host the
tutorial.php.most of the free web hosting does not support it, that is why after creating it, you may get error from the web browser.
you may like to read
indian web proxy version 2 download
some people also make the mistake of uploading the other php files like
testmyserver and
php.in which is not needed.so follow the steps by step guide bellow :
so how can i create indian web proxy server from scratch
step1: Google for free web-host, in this case we shall use
sharkserve.com as example
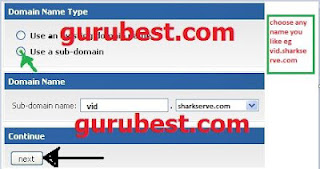
step2: visit sharkserve.com,click on sign up. then choose
use a sub domain, then fill in any name you like for the sub domain name
e.g
yourname.sharkserve.com.a page will open.choose
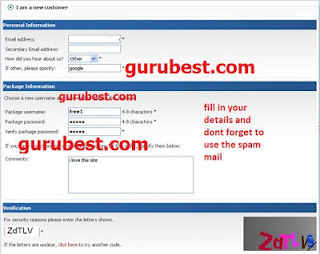
i am a new customer, then fill in the registration form.
 |
| how to create indian web proxy server |
 |
| create your own indian web server |
step3: after filling and completing the registration form, they will send you a message that your hosting account will be activated within 24 hours, just wait till then.
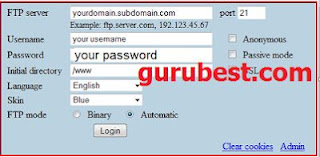
step4: check your mail to see if the hosting account have been activated, if yes then, go to
www.net2ftp.com . fill in you domain details e.g
ftp server= yourname.subdomain.com,
username= your username,
password= your password,
initial directory= /www
 |
| how to create indian web proxy server |
step5: after filling your domain details, just logging.you will see different option, search for upload at the upper corner of the page, then click the upload option, a page will open.all you need to do is to click browse button, a window will pop up asking you to find the file you wish to upload,in this case search for the
tutorial.php file from your computer and click upload and wait for it to complete.that's is all.you have successfully
create your iwp server.
step6: now go to your web browser firefox and set the manual configuration to use
http proxy=localhost,
port=6050,
ssl proxy=localhost,
port=6051.
you are done
NOTE: the web hosting i used as illustration may not be available, so look for free hosting that support php file and or cpanel(control panel).
in my future post, i will share with you a video tutorial on how to create iwp server, so subscribe by email and never miss any of my post again
Subscribe by email. ENJOY.
if you find this post helpful,kindly share it with your friends.
if you have any suggestion to make or you just want to ask question, kindly make use of the comment form and i will respond to it immediately.
more articles update is posted on
gurubest every day,so don't be the last to get update to your email.
Subscribe by email
DON'T FORGET TO SHARE WITH YOUR FRIENDS ON FACEBOOK BY CLICKING THE SHARE BUTTON


Nice tutorial mr john.keep up the good work
ReplyDeleteStraight to the point.if u can create iwp server,then u have no problem browsing wit it
ReplyDeletePls apart from computer can it browse wit ma symbian phone?
ReplyDeleteThanks for your help
ReplyDeleteJust luv the way u simplify and explain this guide.iwp main problem is creating of server.am sure wit this guide i can create mine.thanks alot
ReplyDeleteAnonymous, no its only for computer
ReplyDeleteWhat about IWP current settings?
ReplyDelete@anonymous, i don't know if its still working
ReplyDelete